Hadoop MapReduceで標本平均をスケーラブルに計算する
Hadoop2を使った新しい記事があります。
- Amazon Elastic MapReduce : Hadoop2.4環境で標本平均を計算する(Ruby Client)。
- Amazon Elastic MapReduce : Hadoop2.4環境で100万変量(10GB)の算術平均を計算する。
-
-
-
-
-
-
-
-
-
-
-
-
-
-
-
-
-
-
-
-
-
-
-
-
-
-
-
-
-
-
-
-
-
-
-
-
-
-
-
-
-
-
-
-
-
-
-
-
-
-
-
-
-
-
-
-
- -
-
-
-
-
-
-
-
-
-
-
-
-
-
-
-
-
-
-
-
-
-
-
-
-
-
-
-
-
-
-
-
-
-
-
-
-
-
-
-
-
-
-
-
-
-
-
-
-
-
-
-
-
-
-
-
今回は、ありきたりではあるが、MapReduceがスケールするように配慮し、標本平均を算出するコードを作成し、Amazon Elastic MapReduceで実行する。
開発環境は、Mac OSX Mountain Lion。Hadoopのバージョンは1.1.2である。
1変量の場合: MapReduceによる平均値の計算: Calculation of mean with MapReduce.
プログラムでは、観測値を順に読み込み、(1, 観測値)のKey/Valueを出力する。その結果を、1つのreduceタスクに引き継ぎ、合計とデータ件数を計算したのちに、平均値を出力する。ネットでよく見られるコードである。
MapReduceのプログラムは、以前のログ作成したWordCountのプログラムを流用して製作した。
reduceの出力は、(データ件数,平均値)となっている。
public class Mean {

    public static class Map extends Mapper<LongWritable, Text, LongWritable, DoubleWritable>{

        @Override
        protected void map(LongWritable key, Text value, Context context) throws IOException, InterruptedException{
            String line = value.toString();
            double d = Double.parseDouble(line);
            context.write(new LongWritable(1), new DoubleWritable(d));
        }
    }


    public static class Reduce extends Reducer<LongWritable, DoubleWritable, LongWritable, DoubleWritable>{
    	@Override
        protected void reduce(LongWritable key, Iterable<DoubleWritable> values, Context context) throws IOException, InterruptedException{
    		double sum = 0;
            int num = 0;
            for(DoubleWritable value: values){
            	System.out.println(value.get());
            	sum += value.get();
                num += 1;
            }
            if(num != 0) sum = sum/num;

            context.write(new LongWritable(num), new DoubleWritable(sum));
        }
    }

    public static void main(String[] args) throws IOException, InterruptedException, ClassNotFoundException {
        Job job = new Job(new Configuration(), "cal mean");
        job.setJarByClass(Mean.class);

        job.setMapperClass(Map.class);
        job.setReducerClass(Reduce.class);

        job.setInputFormatClass(TextInputFormat.class);
        job.setOutputValueClass(DoubleWritable.class);
        job.setOutputKeyClass(LongWritable.class);

        FileInputFormat.setInputPaths(job, new Path(args[0]));
        FileOutputFormat.setOutputPath(job, new Path(args[1]));

        boolean success = job.waitForCompletion(true);
        System.out.println(success);
    }

}
上記のプログラムを実行する際には、入出力フォルダーを指定する。
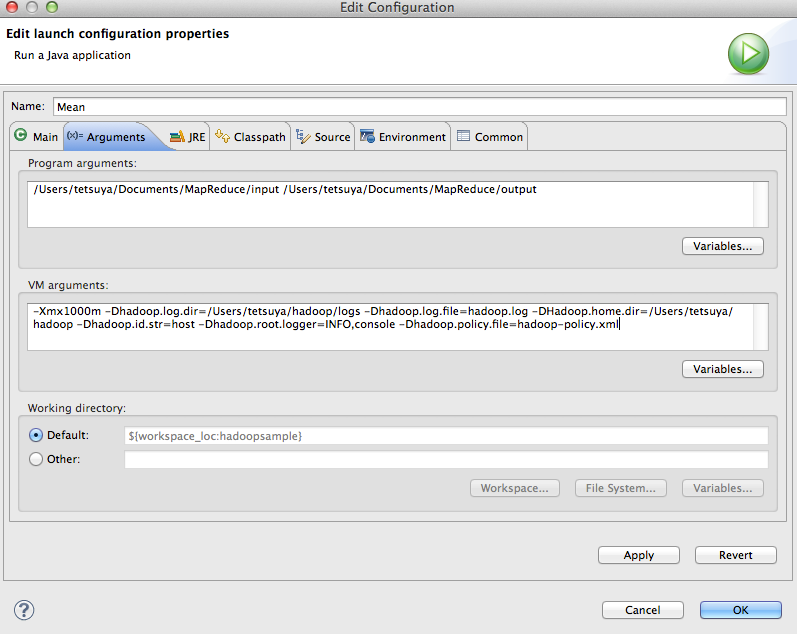
Eclipse上から実行する場合には、以下のように、プログラムを選択し、右クリック、Peopertiesより指定する。
Program Arguments :
/Users/tetsuya/Documents/MapReduce/input /Users/tetsuya/Documents/MapReduce/output
VM Arguments:
-Xmx1024m -Dhadoop.log.dir=/Users/tetsuya/hadoop/logs -Dhadoop.log.file=hadoop.log -DHadoop.home.dir=/Users/tetsuya/hadoop -Dhadoop.id.str=host -Dhadoop.root.logger=INFO,console -Dhadoop.policy.file=hadoop-policy.xml
データには、先のログで使用した相関の存在する100個のデータを使用した。
prt-r-00000の内容は以下となり、先のログの結果と一致した。
100 5.409325112518855
多変量の場合:MapReduceによる平均値の計算: Calculation of means of multiple variables with MapReduce.
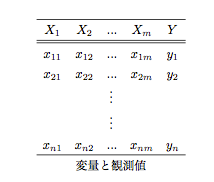
1変量ができたので、これを多変量に拡張する。データの形式は、上の表に準じて列が変量、行がサンプルを表すとする。
(この形式では、変量の数が極端に大きい場合、読み込みに問題がでるであろうと容易に想像がつくが、それについては後のスレッドで議論したい)
プログラムでは、観測値の行を順に読み込み、(列数, 観測値)のKey/Valueを出力する。その結果を、reduceタスクに引き継ぎ、合計とデータ件数を計算したのちに、平均値を出力する。
import java.io.IOException;
import java.util.StringTokenizer;

import org.apache.hadoop.conf.Configuration;
import org.apache.hadoop.fs.Path;
import org.apache.hadoop.io.DoubleWritable;
import org.apache.hadoop.io.LongWritable;
import org.apache.hadoop.io.Text;
import org.apache.hadoop.mapreduce.Job;
import org.apache.hadoop.mapreduce.Reducer;
import org.apache.hadoop.mapreduce.Mapper;
import org.apache.hadoop.mapreduce.lib.input.FileInputFormat;
import org.apache.hadoop.mapreduce.lib.input.TextInputFormat;
import org.apache.hadoop.mapreduce.lib.output.FileOutputFormat;

/**
 *
 * Meansクラス
 *
 * 引数で指定した入力ファイルにある数字の算術平均を計算する。
 *
 */
public class Means {

    public static class Map extends Mapper<LongWritable, Text, LongWritable, DoubleWritable>{

        @Override
        protected void map(LongWritable key, Text value, Context context) throws IOException, InterruptedException{
            String line = value.toString();
            StringTokenizer tk = new StringTokenizer(line);
            int i = 1;
            while(tk.hasMoreTokens()){
            	double d = Double.parseDouble(tk.nextToken());
                context.write(new LongWritable(i), new DoubleWritable(d));
                i++;
            }
        }
    }

    public static class Reduce extends Reducer<LongWritable, DoubleWritable, LongWritable, DoubleWritable>{
    	@Override
        protected void reduce(LongWritable key, Iterable<DoubleWritable> values, Context context) throws IOException, InterruptedException{
    		double sum = 0;
            int num = 0;
            for(DoubleWritable value: values){
            	sum += value.get();
                num += 1;
            }
            if(num != 0) sum = sum/num;

            context.write(key, new DoubleWritable(sum));
        }
    }

    public static void main(String[] args) throws IOException, InterruptedException, ClassNotFoundException {
        Job job = new Job(new Configuration(), "cal means");
        job.setJarByClass(Means.class);

        job.setMapperClass(Map.class);
        job.setReducerClass(Reduce.class);

        job.setInputFormatClass(TextInputFormat.class);
        job.setOutputValueClass(DoubleWritable.class);
        job.setOutputKeyClass(LongWritable.class);

        FileInputFormat.setInputPaths(job, new Path(args[0]));
        FileOutputFormat.setOutputPath(job, new Path(args[1]));

        boolean success = job.waitForCompletion(true);
        System.out.println(success);
    }
}
テストのための変量はX1からX10とYの11とし、サンプルサイズ=1000として、以下のように生成した。
| X1からX10 | [0,10]の一様乱数より生成 |
| Y | X1 から X10までを加算して、N(0,1)の正規乱数を加算して生成 |
形式は以下のような1000*11の行列になっており、これをTextInputFormatとして読み込む。
5.519 4.710 8.263 3.375 5.236 6.545 0.254 5.115 3.434 4.190 55.750
8.431 6.157 7.668 8.167 4.806 6.630 6.729 6.864 4.305 6.616 76.665
…..
これを、/Users/tetsuya/Documents/MapReduce/input/meansフォルダーにおいてmap関数の入力値とし、/Users/tetsuya/Documents/MapReduce/outputフォルダーに出力する。
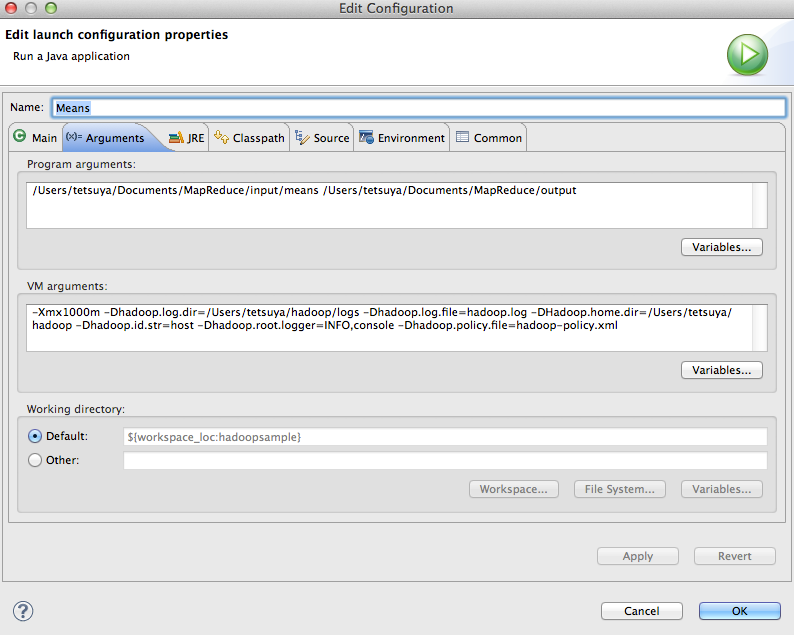
プログラムを実行するには、これらを引数として指定する。指定方法は上と同様である。
Program Arguments :
/Users/tetsuya/Documents/MapReduce/input/means /Users/tetsuya/Documents/MapReduce/output
ヒープサイズなどが気になったり、ログの書き出し先を指定したい場合などは、以下の例ようにVM argumentに設定する。
VM Arguments: -Xmx1000m -Dhadoop.log.dir=/Users/tetsuya/hadoop/logs -Dhadoop.log.file=hadoop.log -DHadoop.home.dir=/Users/tetsuya/hadoop -Dhadoop.id.str=host -Dhadoop.root.logger=INFO,console -Dhadoop.policy.file=hadoop-policy.xml
以下に実行結果(形式)を示す。
1	5.021530845491216
2	4.907599542578683
3	5.2718549369904215
4	5.056304642488248
5	4.918731338686776
6	4.975755973395426
7	4.962228949838318
8	5.0072190376440995
9	5.046908281387296
10	5.068709502150305
11	60.265853429516454
比較のために、以下にデータを生成したRのプログラムと、Rにより算出した算術平均を示す。
> vx1 <- c()
> vx2 <- c()
> vx3 <- c()
> vx4 <- c()
> vx5 <- c()
> vx6 <- c()
> vx7 <- c()
> vx8 <- c()
> vx9 <- c()
> vx10 <- c()
> vy <- c()
>
>
> for(i in c(1:1000)){
+ x1 <- runif(1)*10
+ x2 <- runif(1)*10
+ x3 <- runif(1)*10
+ x4 <- runif(1)*10
+ x5 <- runif(1)*10
+ x6 <- runif(1)*10
+ x7 <- runif(1)*10
+ x8 <- runif(1)*10
+ x9 <- runif(1)*10
+ x10 <- runif(1)*10
+ y <- x1 + x2 +x3 + x4 + x5 + x6 + x7 + x8 + x9 + x10 + 10 + rnorm(1,mean=0, sd=1)
+ vx1 <- append(vx1,x1)
+ vx2 <- append(vx2,x2)
+ vx3 <- append(vx3,x3)
+ vx4 <- append(vx4,x4)
+ vx5 <- append(vx5,x5)
+ vx6 <- append(vx6,x6)
+ vx7 <- append(vx7,x7)
+ vx8 <- append(vx8,x8)
+ vx9 <- append(vx9,x9)
+ vx10 <- append(vx10,x10)
+ vy <- append(vy,y)
+ }
>
> m <- cbind(vx1,vx2,vx3,vx4,vx5,vx6,vx7,vx8,vx9,vx10,vy)
>
c(mean(vx1),mean(vx2),mean(vx3),mean(vx4),mean(vx5),mean(vx6),mean(vx7),mean(vx8),mean(vx9),mean(vx10),mean(vy))
 [1]  5.021531  4.907600  5.271855  5.056305  4.918731  4.975756  4.962229
 [8]  5.007219  5.046908  5.068710 60.265853
多変量の場合のプログラムを、Amazon Elastic MapReduce(Amazon EMR)で実行する。
以下のようにして、Amazon EMRで実行することにする。
EMRの操作は、以前に紹介したElastix MapReduce Rubyコマンドラインツールを用いて行う。
Amazon EMR コンフィギュレーション:マスタ1、コア2
マスタインスタンス1つ、マスタインスタンス2つを起動する。Amazon EMRの料金は、EC2の利用料+EMRの利用料となっている。EC2の利用料には、スポットプライス(こちらページに掲載されている)を利用できるので、利用時点のプライスに会わせて決定した。
elastic-mapreduce --create --alive --name Mean-Cluster --instance-group master --instance-type m1.small --instance-count 1 --bid-price 0.01 --instance-group core --instance-type m1.small --instance-count 2 --bid-price 0.01

Created job flow j-1XXXXXXXXXX
Amazon S3に入力用のフォルダーを作成し、データをアップロードする。
インスタンスが起動したら、以下のようにステップを追加する。
elastic-mapreduce --jar s3n://[your bucket name]/[your folder which jar is placed]/hadoopsample.jar --main-class Means --args s3n://[your bucket name]/[your folder for input]/,s3n://[your bucket name]/[your folder for output] --step-name Means --jobflow j-1XXXXXXXXXX
ステップを追加したら、
http://[your uri of master EC2 instance]:9100
にアクセスしてJobTrackerを見る。(Security Groupの設定については、先のログを参照してください)
上のクラスター構成の場合、Mapのキャパシティーが4、reduceキャパシティーが2となっていることがわかる。
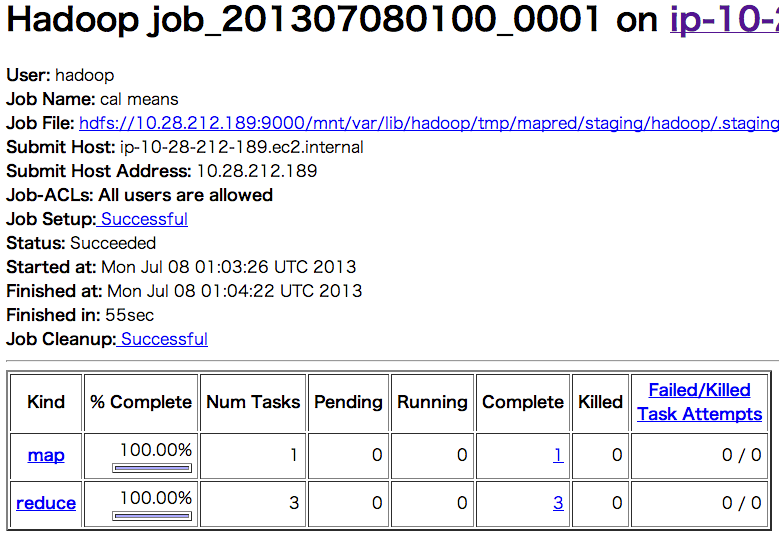
JobトラッカーからJob Detailをみて、以下ように表示があれば正常に終了している。
上の図を見ると、以下のように実行時間が表示されているのがわかる。
Status: Succeeded
Started at: Mon Jul 08 01:03:26 UTC 2013
Finished at: Mon Jul 08 01:04:22 UTC 2013
Finished in: 55sec
正常終了後、出力フォルダーに指定したS3のフォルダーをみると、以下のようになる。
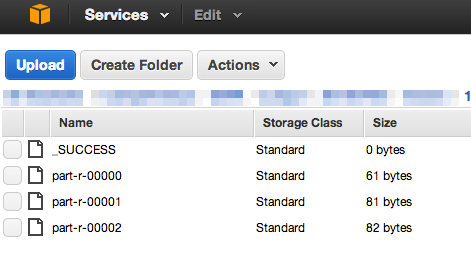
以下はpart-r-00002である。
2	4.907599542578683
5	4.918731338686776
8	5.0072190376440995
11	60.26585342951642
